
A while ago I switched from Windows 10 to an Ubuntu based distro called Kubuntu and I never looked back.
As much as I like Windows and it’s features, I have strong dislike towards Microsoft and the privacy-invasive methods they utilize in Windows 10.
While there are plenty of Linux alternatives for Windows applications like: LibreOffice (Microsoft Office), GIMP (Adobe Photoshop), Kate (Notepad), etc… and WINE is pretty good when it comes to running Windows applications but eventually you will need the actual operating system to run a specific software or a DirectX video game that just doesn’t work well (or at all) on WINE. Virtualization is perfect if you hate dual-booting and you don’t want Windows as your primary operating system.
Let’s be real, no one is going to give up on Adobe Photoshop for GIMP or use LibreOffice in a professional environment and playing Solitaire on Linux is nowhere near as fun as playing it on Windows.
IMPORTANT: Before you start
Disclaimer
While I don’t want to discourage anyone from following this guide if they really need to set up a virtual machine with a single GPU I still have to state that there is absolutely no guarantee that this guide will work for you, the process can be different for every computer and distro and setting up a virtual machine with a single GPU passthrough can be different between different CPU and GPU models/vendors/brands. Kernel and package updates may also cause something explained in this guide to not work anymore. You also risk bricking your GPU if you do something wrong. I am not responsible for any damage this might cause to your computer (both hardware and software).
Everything you do is at your own risk.
Requirements
- A CPU that supports virtualization
- Virtualization enabled in your BIOS
- An NVIDIA GPU (This guide only covers passthrough on NVIDIA GPUs)
- Kubuntu 20.10 (Can work on Kubuntu 20.04 too, ubuntu will require some changes to the shell script provided in this guide)
- A hex editor
Caveats
- The virtual machine must be run with sudo
- No audio from HDMI on host machine (at least in my case)
- One operating system at a time (But you can still ssh to your host)
Useful Links
- https://github.com/joeknock90/Single-GPU-Passthrough
- https://wiki.archlinux.org/index.php/PCI_passthrough_via_OVMF
- https://mathiashueber.com/fighting-error-43-nvidia-gpu-virtual-machine/
Getting Started
Installing QEMU/Libvirt/Virt-Manager
Install the required packages:
sudo apt install -y qemu qemu-kvm libvirt-daemon libvirt-clients bridge-utils virt-managerAfter you installed the packages, log out and re-log back in to apply group membership changes made by libvirt.
Setting up libvirt-hooks
libvirt-hooks allow for automatically calling shell scripts when the virtual machine starts up and shuts down.
sudo wget 'https://raw.githubusercontent.com/PassthroughPOST/VFIO-Tools/master/libvirt_hooks/qemu' -O /etc/libvirt/hooks/qemu
sudo mkdir /etc/libvirt/hooks/qemu.d
sudo chmod +x /etc/libvirt/hooks/qemu
sudo service libvirtd restart
The Virtual Machine
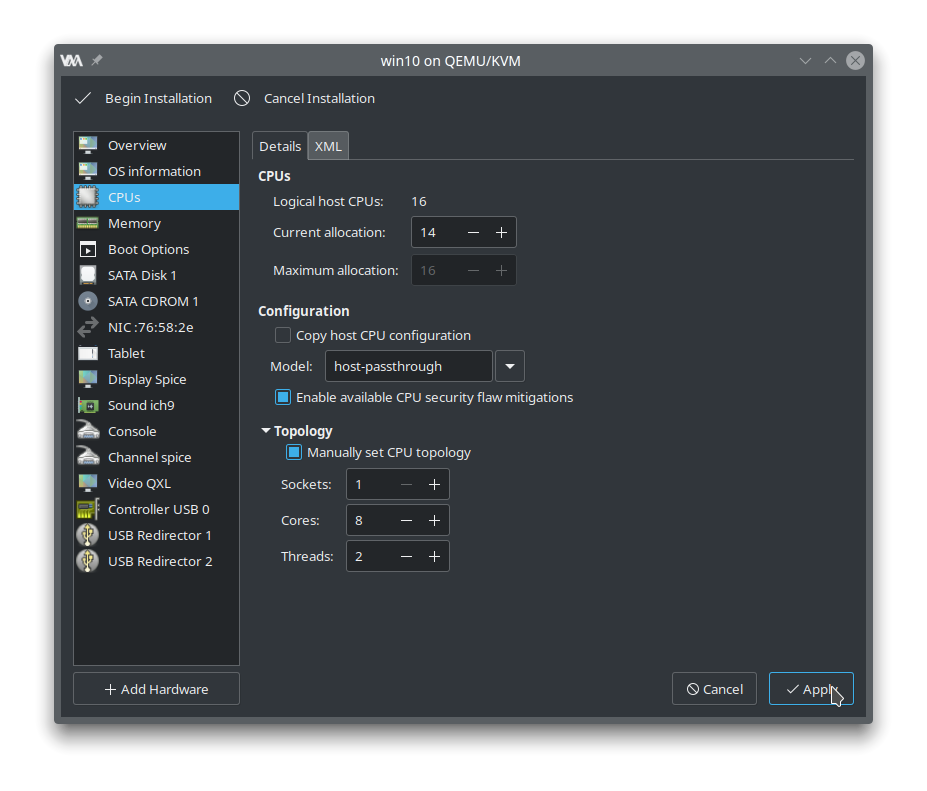
CPU Settings
This is not required but I will explain how to set up the CPU. I have an 8-core Ryzen 7 1700X. I will set the model to “host-passthrough” and manually set the CPU topology.
In order to get the CPU topology, run lscpu in the terminal.
dennisstanistan@dennisstanistan-amd64:~$ lscpu
Architecture:                    x86_64
CPU op-mode(s):                  32-bit, 64-bit
Byte Order:                      Little Endian
Address sizes:                   43 bits physical, 48 bits virtual
CPU(s):                          16
On-line CPU(s) list:             0-15
<b>Thread(s) per core:              2</b>
<b>Core(s) per socket:              8</b>
<b>Socket(s):                       1</b>
NUMA node(s):                    1
Vendor ID:                       AuthenticAMD
CPU family:                      23
Model:                           1
Model name:                      AMD Ryzen 7 1700X Eight-Core Processor
The 1700X has 2 threads per core, 8 cores per socket and there’s only 1 socket.
Now with Ryzen CPUs if you will try and run any newer builds (1809 and above) of Windows 10 in a virtual machine using ‘host-passthrough’ you will be greeted with a blue screen that throws following stop code: SYSTEM_THREAD_EXCEPTION_NOT_HANDLED
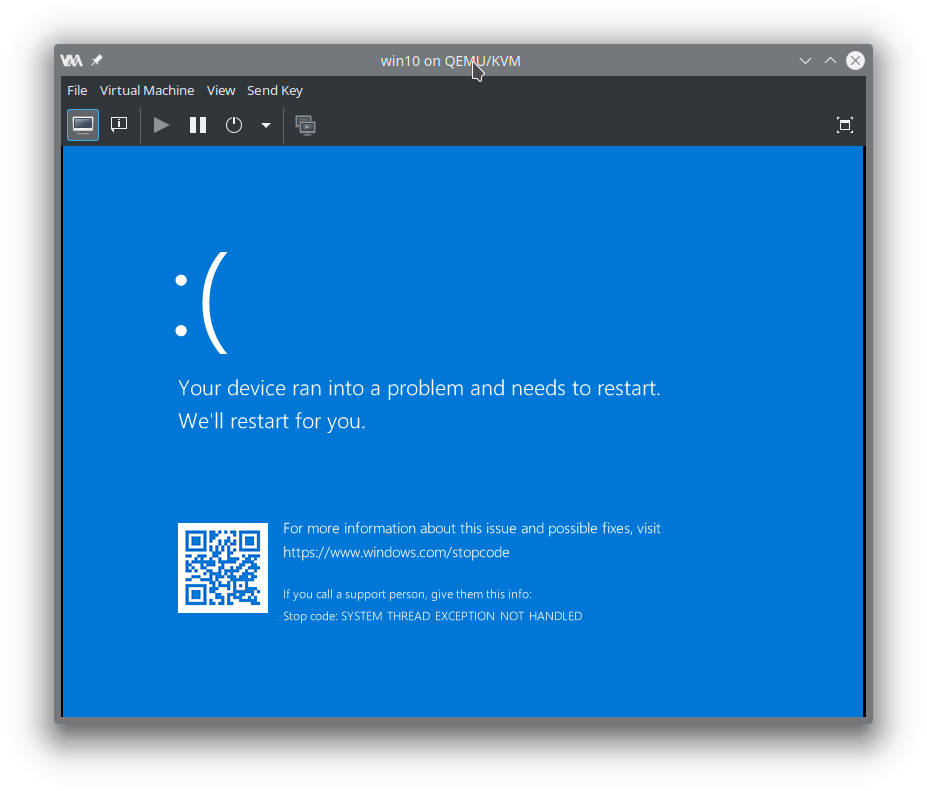
To fix that, we will need to set ignore_msrs to 1.
sudo sh -c 'echo "options kvm ignore_msrs=1" > /etc/modprobe.d/kvm.conf'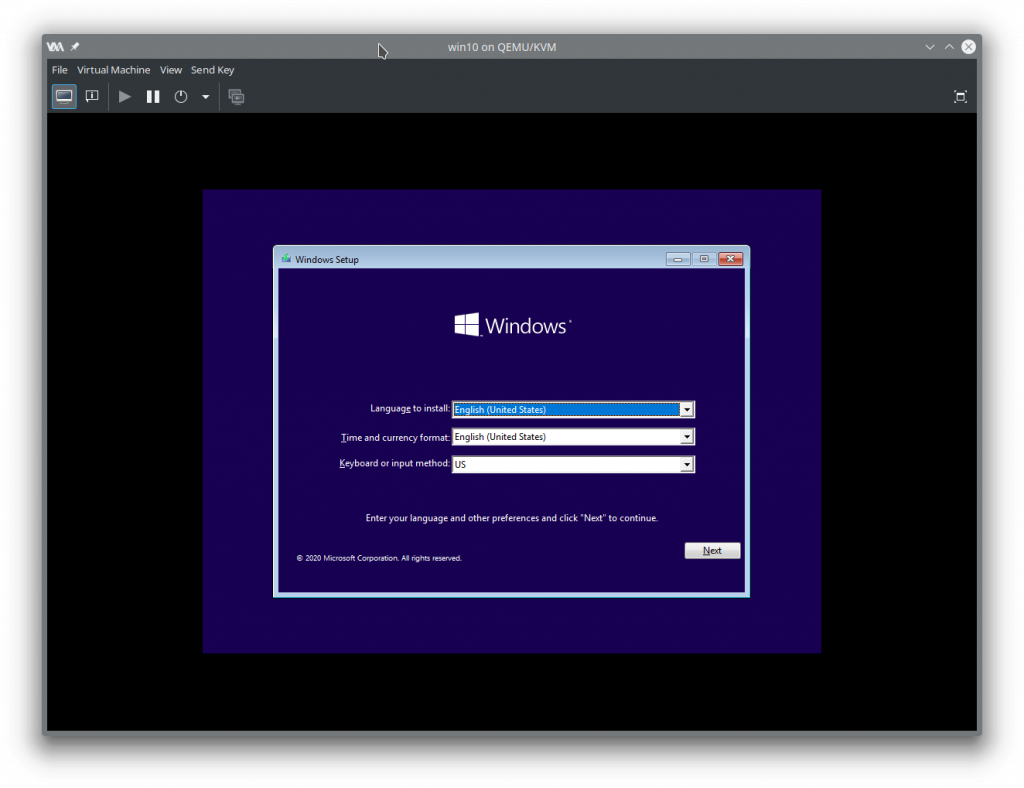
I won’t install Windows 10 yet but instead I will shut down the virtual machine and edit the settings again.
Adding Hardware
I will remove the following components: Tablet, Display Spice, Serial 1, Channel spice, Video QXL, USB Redirector 1 and USB Redirector 2.
We won’t need any of them since we will want to use the GPU for the display.
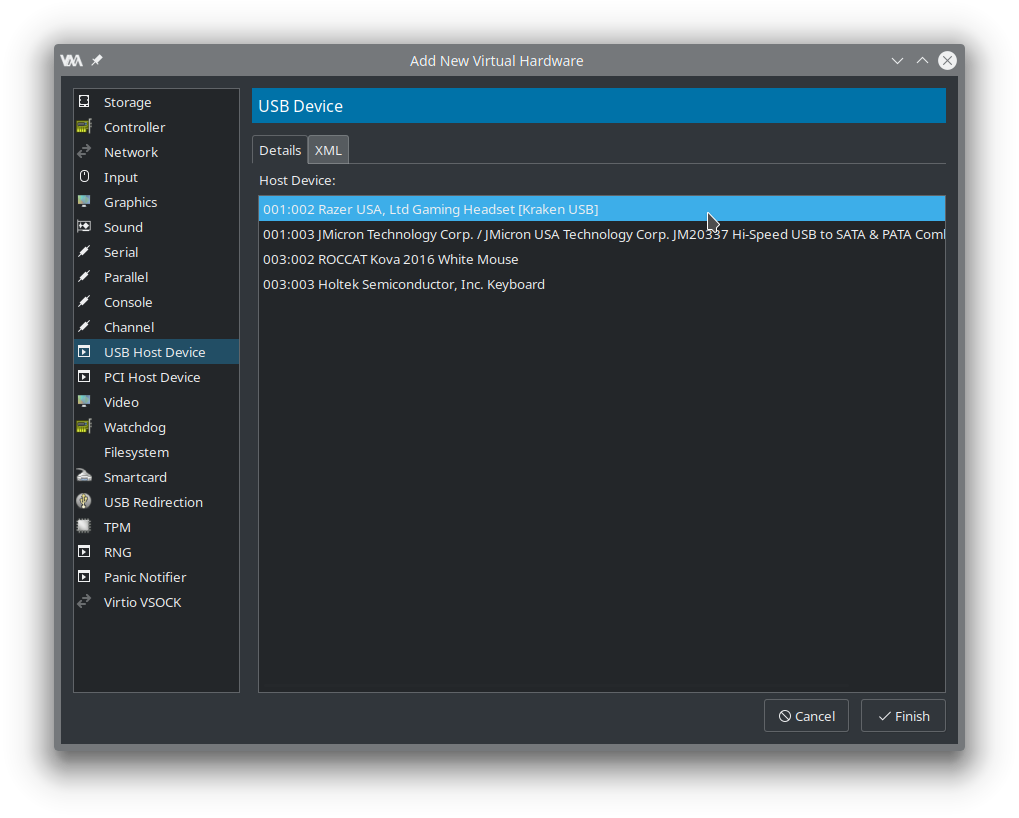
We need to pass the mouse and keyboard to the virtual machine otherwise you will not be able to do anything inside the VM.
Next, we will pass our GPU PCI devices, I have a GeForce GTX 970 so in my case these devices will be: “NVIDIA Corporation GM204 [GeForce GTX 970]” and “NVIDIA Corporation GM204 High Definition Audio Controller”.
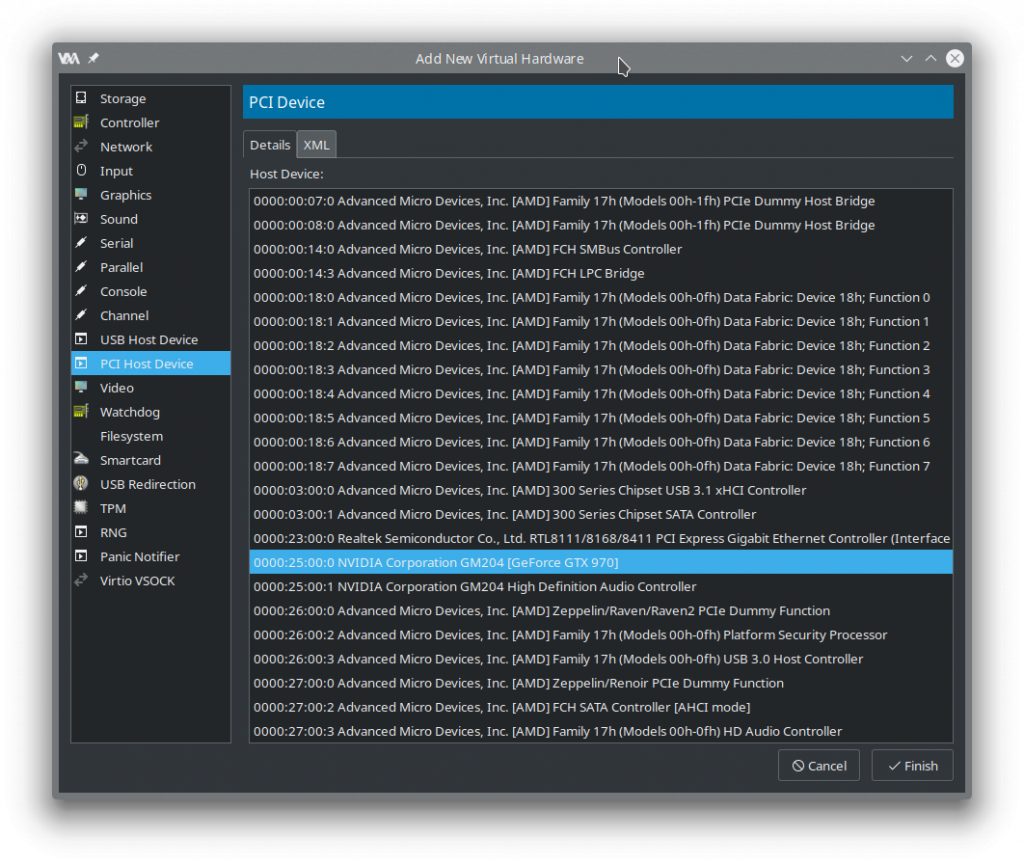
Required settings inside the VM’s XML
We will need to add a few options inside our virtual machine’s xml configuration. Enable XML editing inside the Virtual Machine Manager main window by going to Edit -> Preferences -> General and toggling Enable XML editing on.
Or if you’re a nerd you can run virsh edit {your_vm_name} instead.
First we must hide the virtual machine status from from NVIDIA otherwise you will be greeted with the infamous driver error “Code 43”.
The error’s description is roughly translated to: “You must be rich and buy a Quadro GPU in order to use our graphics cards inside a virtual machine”.
Inside the XML file navigate to the features tag and add the following vendor_id, hidden and ioapic tags:
<features>
    ...
    <hyperv>
      ...
      <vendor_id state="on" value="thissucks"/> <!-- value can be whatever like "hello", maximum of 12 characters-->
    </hyperv>
    <kvm>
      <hidden state="on"/>
    </kvm>
    ...
    <ioapic driver="kvm"/>
</features>
You can read more about Error 43 here: https://mathiashueber.com/fighting-error-43-nvidia-gpu-virtual-machine/
Now locate the hostdev tag of the GPU, we will add a rom tag to it with a file attribute that contains the location of the path for our soon to be patched VBIOS ROM. Don’t add the ROM tag to the high definition audio hostdev entry.
<hostdev mode="subsystem" type="pci" managed="yes">
  <source>
    ...
  </source>
  <rom file="/home/dennisstanistan/cool/gtx970.rom"/>
  ...
</hostdev>
Apply your settings but don’t run the virtual machine yet!
Patching the GPU’s VBIOS ROM
Nvidia VBIOSes contain an Nvidia header which prevents the VBIOS from working in a virtual machine. You can dump the VBIOS from the GPU or get the appropriate VBIOS for your card from TechPowerUp. I won’t be covering VBIOS dumping in this guide.
Acquiring the VBIOS ROM
We will need to get the GPU’s device & vendor ID and the card’s current VBIOS version before we get the VBIOS from TechPowerUp.
Open NVIDIA X Server Settings and navigate to GPU 0.
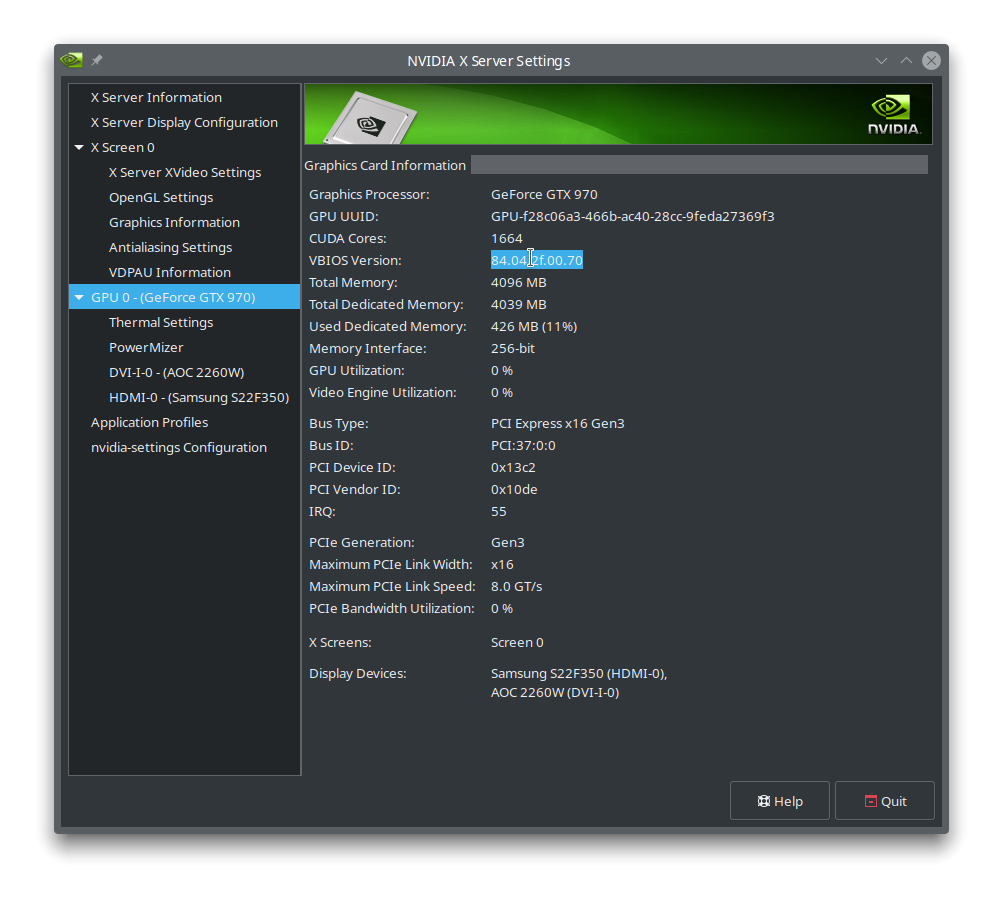
I have a GTX 970 with VBIOS version 84.04.2F.00.70, the device ID is 0x13c2 and the vendor id is 0x10de. Search for your card and version in TechPowerUp.

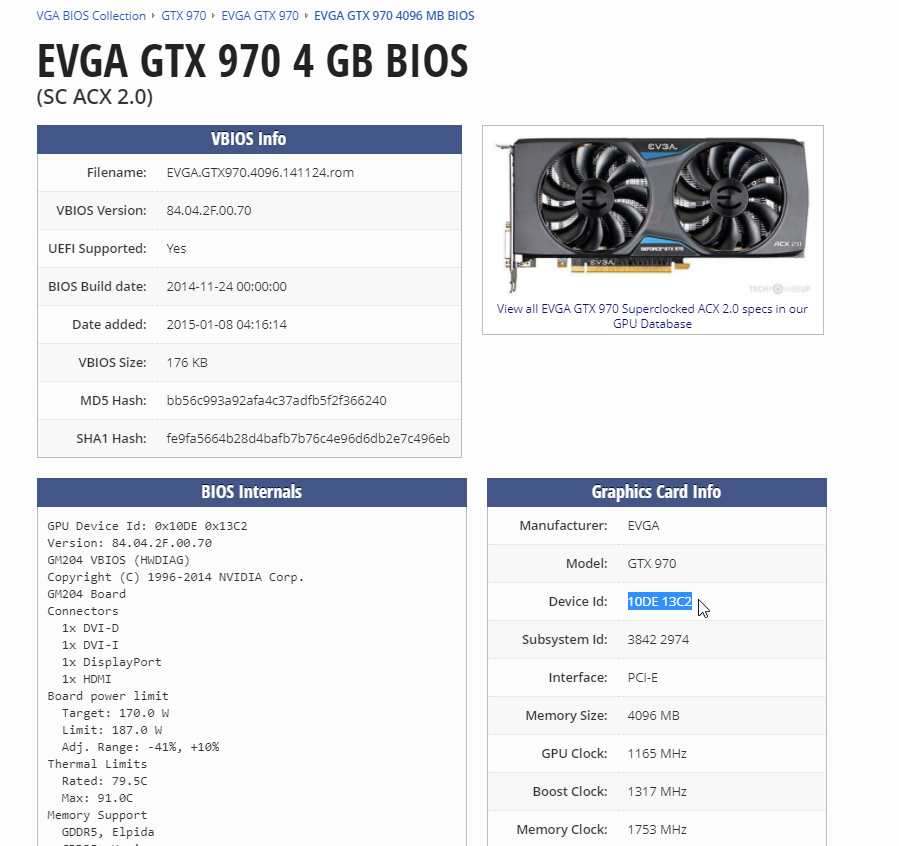
Verify that the device ID matches up with the ids you got from NVIDIA X Server Settings window and then download the ROM.
Removing the NVIDIA Header from the VBIOS
Open the ROM file with a hex editor and search for the string “VIDEO“.
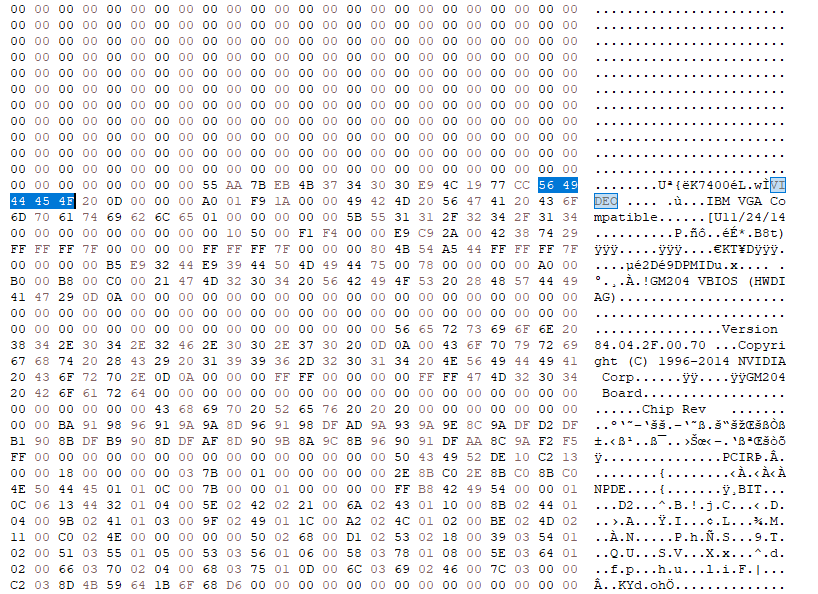
You will see the character U a few bytes before VIDEO.
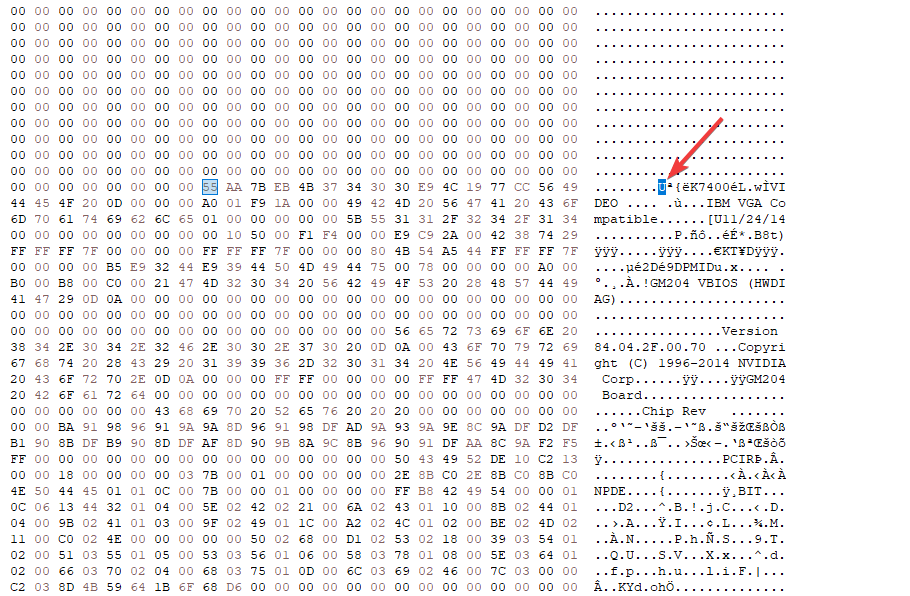
Now delete everything before that character so that the file will start with the character U.
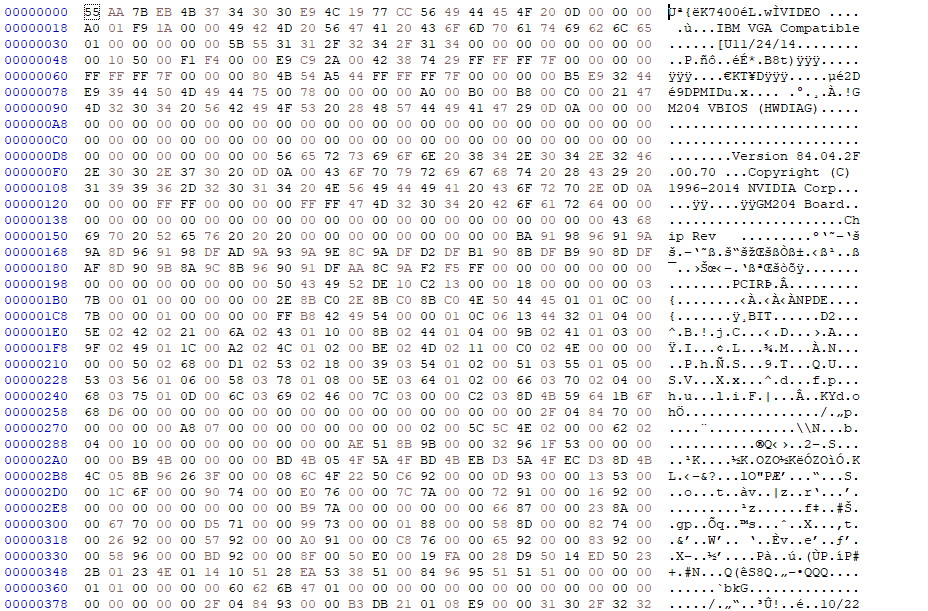
Save the ROM file to the path you defined in the rom tag inside the virtual machine XML eariler. In my case, I will save the file to /home/dennisstanistan/cool/gtx970.rom
Setting up Hooks
For a GPU passthrough setup, the host must call a few commands before the virtual machine can be properly initialized with the GPU.
We will need to create the directories: prepare/begin and release/end inside /etc/libvirt/hooks/qemu.d/ for our virtual machine.
cd /etc/libvirt/hooks/qemu.d
sudo mkdir -p {your_vm_name}/prepare/begin
sudo mkdir -p {your_vm_name}/release/end
Change {your_vm_name} to your virtual machine’s name.
Any shell script inside prepare/begin will be called once we start the virtual machine and any script inside release/end will be called once the VM is terminated. If you have a virtual machine called “win10” and you put scripts inside /etc/libvirt/hooks/qemu.d/win10/prepare/begin and /etc/libvirt/hooks/qemu.d/win10/release/end the scripts will be called when you start/shutdown the “win10” virtual machine.
I will provide two scripts that I used but you will have to edit them according to your PCI devices and distro.
prepare/begin/start.sh:
#!/bin/bash
# Original script provided at https://github.com/joeknock90/Single-GPU-Passthrough
# You should only use these scripts as templates and write your own as stated in the repository's readme.

# Helpful to read output when debugging
set -x

# I don't need to call that
#systemctl isolate multi-user.target

# Stop the display manager service
systemctl stop display-manager.service

# Stop the pulse audio service
systemctl stop pulseaudio.service

# Terminate KDE
kquitapp5 plasmashell || killall plasmashell
killall kwin_x11

# Unbind VTconsoles
echo 0 > /sys/class/vtconsole/vtcon0/bind
echo 0 > /sys/class/vtconsole/vtcon1/bind

# Unbind EFI-Framebuffer
echo efi-framebuffer.0 > /sys/bus/platform/drivers/efi-framebuffer/unbind

# If you have the beep package installed and your motherboard has a speaker then this can provide you
# with some sort of feedback on what's going on.
#enable pcspkr
#modprobe pcspkr
#beep -l 100 -f 1000

# Avoid a Race condition by waiting 5 seconds. This can be calibrated to be shorter or longer if required for your system
sleep 8

# Unload all Nvidia drivers
modprobe -r nvidia_drm
modprobe -r nvidia_uvm
modprove -r nvidia_modeset
modprobe -r nvidia
# snd_hda_intel is used for the HDMI audio
# snd_hda_intel is blacklisted completely on my system, so I don't really need a call to remove it since it's not loaded.
modprobe -r snd_hda_intel

#beep -l 500 -f 1000

nvProbCount=$(lsmod | grep nvidia | wc -l)

if [ $nvProbCount -gt 0 ]
then
        # what the fuck!
        # let us know via the pc speaker that something got fucked
        # beep -f 300 -l 1000
        sleep 1000 # wait a second
        virsh destroy {your_vm_name} # error, forcefully shut down the vm
        exit 1
fi

## Detach the GPU
virsh nodedev-detach pci_0000_25_00_0 # Change pci_0000_25_00_0 to the appropriate PCI address that your GPU resides on.
virsh nodedev-detach pci_0000_25_00_1 # Change pci_0000_25_00_1 to the appropriate PCI address that your GPU audio controller resides on.

# Load VFIO Kernel Module
modprobe vfio-pci

#beep -l 100 -f 1000
#modprobe -r pcspkr
release/end/revert.sh
#!/bin/bash
# Original script provided at https://github.com/joeknock90/Single-GPU-Passthrough
# You should only use these scripts as templates and write your own as stated in the repository's readme.

# Helpful to read output when debugging
set -x

# Unload VFIO-PCI Kernel Driver
modprobe -r vfio-pci
modprobe -r vfio_iommu_type1
modprobe -r vfio

# Re-Bind GPU to Nvidia Driver
virsh nodedev-reattach pci_0000_25_00_1 > /dev/null 2>&1
virsh nodedev-reattach pci_0000_25_00_0 > /dev/null 2>&1

# Rebind VT consoles
echo 1 > /sys/class/vtconsole/vtcon0/bind
# Some machines might have more than 1 virtual console. Add a line for each corresponding VTConsole
echo 1 > /sys/class/vtconsole/vtcon1/bind

# Re-Bind EFI-Framebuffer
nvidia-xconfig --query-gpu-info > /dev/null 2>&1
echo "efi-framebuffer.0" > /sys/bus/platform/drivers/efi-framebuffer/bind

# It's blacklisted on my system, no need for me to enable it back.
#modprobe snd_hda_intel
modprobe nvidia_uvm
modprobe nvidia_drm
modprobe nvidia_modeset
modprobe nvidia

# Restart Display Manager
systemctl start display-manager.service

kstart5 plasmashell

#systemctl isolate graphical.target
Editing GRUB
We will need to edit the GRUB configuration file, the file is located at /etc/default/grub.
I will edit it by calling sudo nano /etc/default/grub and add the following variables to GRUB_CMD_LINUX_DEFAULT:amd_iommu=on iommu=pt kvm_amd.npt=1 kvm.ignore_msrs=1
GRUB_CMDLINE_LINUX_DEFAULT should look something like this now:GRUB_CMDLINE_LINUX_DEFAULT="quiet splash amd_iommu=on iommu=pt kvm_amd.npt=1 kvm.ignore_msrs=1"
If you’re using an Intel CPU you will need to use Intel’s equivalent of amd_iommu and kvm_amd.npt.
When you’re done editing the file, run sudo update-grub and reboot your computer.
Running the Virtual Machine
Once you set everything up, added the required tags inside the XML file, patched the VBIOS, edited & updated GRUB, set up hooks that terminates the nvidia drivers and binds the correct PCI addresses to the VM then you are ready to start the virtual machine. You will need to run the virtual machine with sudo like so:
sudo virsh start {your_vm_name}
The screen will turn black and after a few seconds the Windows 10 boot screen should appear.
Now you will need to change your virtual machine settings to tweak the performance, there are plenty of resources online about tweaking your VM for the best possible performance though some settings change between CPUs and brands.
Blacklisting snd_hda_intel (Optional)
I had cases in Kubuntu 20.04 where calling modprobe -r snd_hda_intel would sometimes fail which will cause virsh nodedev-detach to hang on the GPU’s audio controller. In 20.10 it kept on happening no matter how many things I terminated that used snd_hda_intel so I just added it to a blacklist and rebooted the computer.
You can add snd_hda_intel to /etc/modprobe.d/blacklist.conf.
sudo sh -c 'echo "blacklist snd_hda_intel" >> /etc/modprobe.d/blacklist.conf'
Keep in mind that blacklisting the module will disable audio from your HDMI on your host machine.